Thursday 23 May 2013

How to display or show comment-author's profile image in BlogSpot blogs

Filled under:


Here's another useful tip for those bloggers, who are continuously trying to transform their free BlogSpot blogs into a pro-blog.
Through this hack, within 10 minutes you can start showing the images of commentators/comment-authors in your blog.


See the image below; how it will look after tweaking the HTML default code


To do so, first of all log in to Blogger
Now go to Layout, then click on Edit HTML tab.
Now Download the present template as a back up
Then click on "Expand widget templates"

Now search (CTRL+F) this

</head>

Immediately BEFORE IT, paste this:

<!--COMMENT-AUTHOR-PICTURE-STARTS--><script src='http://dsai.588.googlepages.com/blogger_comment_author_photos.js' type='text/javascript'/>
<script type='text/javascript'>
//<![CDATA[
addLoadEvent(function(){showCommentPhotos('commentphoto','comment-author', 1);});
//]]>
</script><!--COMMENT-AUTHOR-PICTURE-STOPS-->

NOW see this code below:

<dl id='comments-block'>
<b:loop values='data:post.comments' var='comment'>
<dt class='comment-author' expr:id='"comment-" + data:comment.id'>
<div class='commentphoto' style='float:right;'/>
<a expr:name='"comment-" + data:comment.id'/>
<b:if cond='data:comment.authorUrl'>
<a expr:href='data:comment.authorUrl' rel='nofollow'><data:comment.author/></a>
<b:else/>
<data:comment.author/>
</b:if>
<data:commentPostedByMsg/>
</dt>
<dd class='comment-body'>
<b:if cond='data:comment.isDeleted'>
<span class='deleted-comment'><data:comment.body/></span>
<b:else/>
<p><data:comment.body/></p>
</b:if>
</dd>
<dd class='comment-footer'>
<span class='comment-timestamp'>
<a expr:href='"#comment-" + data:comment.id' title='comment permalink'>
<data:comment.timestamp/>
</a>
<b:include data='comment' name='commentDeleteIcon'/>
</span>
</dd>
<div style='clear:both;'/>
</b:loop>
</dl>
In the code above YOU HAVE TO INSERT code lines shown in BLUE and BOLDED
And the red ones, are those which you can use as markers, BEFORE whom you have to paste the blue code lines.

You can change the position of pictures or images from Right to Light, by changing it in the first blue line in the code above...
Now whenever, people use their gmail or openid account to comment, then their pictures will be displayed alongside the comments !<>

Posted By Unknown01:57

Wednesday 22 May 2013

Step-by-Step Tutorials-SUBMIT YOUR BLOG TO THE THREE SEARCH ENGINE - GOOGLE, YAHOO AND BING

Filled under:

Just Signing up for Blogger and posting posts regularly in your Blog does not make your job complete in any sense. What is the point of posting when none in the World knows about it???

Yeah, The immediate step after creating a Blog account in Blogger is SUBMITTING IT TO SEARCH ENGINES (Particularly GOOGLEBING and YAHOO!). By this process, You just say GOOGLEYAHOO!and BING that "I'm also competing in this Internet world by Posting Blogs, And I request you to Display those Posts on your pages when searches are made." 

Let us now proceed with the steps of SUBMITTING THE BLOG to GOOGLEYAHOO! and BING.

1. SUBMITTING YOUR BLOG TO GOOGLE:


Follow the steps given below to submit the Blog to GOOGLE.

Log in to the GOOGLE WEBMASTER TOOLS WEBSITE (Click Here to Go to the WEBSITE) with yourGOOGLE account. If you don't have one, Then Create one by clicking on the SIGN UP Button on the Top Right corner of the Website and Log in with those details. 


Now, Click on ADD A SITE Button (Which is indicated in the below Image) to add your Blog to GOOGLE


Now, Enter the URL of your blog in the space provided. (Example: www.YOURBLOGNAME.blogspot.com) 


In The next step, You have to verify the ownership of your Blog (GOOGLE just wants to be sure you areORIGINAL OWNER of your Blog). To make your VERIFICATION PROCESS get completed soon, Click on the ALTERNATE METHODS Tab as indicated in the Image. 


Here, You are provided with three options, HTML TAGGOOGLE ANALYTICSDOMAIN NAME PROVIDER. Just click on the HTML TAG Radio Button and you will be provided with a META TAG.


Now, Copy the META TAG and Paste it in your Blog's Homepage. Just make it sure that you paste theMETA TAG in the HEAD SECTION BEFORE THE FIRST BODY SECTION

Aren't you clear of Where to paste this META TAG, Just follow the below instructions to Paste the META TAG in the right place.

Go to your BLOG'S DASHBOARD and Select TEMPLATE and Click on EDIT HTML Button available underLIVE ON BLOG View (As Indicated in the below Image). 


Now find the below TAG in your Blog's HTML Coding Using CTRL+F Shortcut. 


<title><data:blog.pageTitle/></title>

Just Paste the META TAG (Which you copied previously, REMEMBER????BEFORE/ABOVE the foundTAG in the previous step.
After Pasting the META TAG, Just SAVE the Template and RETURN to the GOOGLE WEBMASTER TOOLS again and Click the VERIFY button at the bottom. 

Now, The Webmaster Tools will check to see, If the META TAG is present in your Blog or not. If it is,GOOGLE will VERIFY you as the SITE OWNER of the Blog.
If your verification is Successful, You will receive the following sort of message. (Leave the META TAG in your BLOG'S CODING to keep your Blog verification stand permanently even after verification is completed). 
That is it, Your Blog is One in GOOGLE now!!!

KEEP IN MIND THAT JUST SUBMITTING YOUR BLOG TO GOOGLE DOES NOT KEEP IT UPDATED ALL THE TIME. YOU WOULD NEED TO PING YOUR BLOG POSTS WHENEVER YOU CREATE A NEW POST. Follow this Link to PING YOUR BLOG TO GOOGLE (CLICK HERE>>>).

2. SUBMIT YOUR BLOG TO YAHOO!/BING:

Keen viewers of my Blog May ask me this QUESTION!!! For Blog submission to GOOGLE, I used "SUBMIT YOUR BLOG TO GOOGLE" as a Subheading, Whereas I have linked the steps for Submitting the Blog toYAHOO! and BING under a single Subheading as "SUBMIT YOUR BLOG TO YAHOO!/BING". So Am I being loyal to GOOGLE more than BING (or) YAHOO!???? 

It is not the case !!! I will tell you the fact here. 

"ONCE YOU HAVE SUBMITTED YOUR BLOG TO BING, IT MEANS YOU HAVE SUBMITTED YOUR BLOG TO YAHOO! TOO"

But How???? Yeah, Your ANSWER is here.
"It was on August 2010, MICROSOFT and YAHOO! signed a deal to become partners instead of competitors in their DOMAIN SEARCHING. Hence, They became a NewALLIANCE in searching. The Important point of the deal is that BING (Owned byMICROSOFT) will be the search engine behind YAHOO!."
Now, You say me, Is my Subheading for this topic apt?

Having Gained an Extra knowledge on Search Engines, Lets proceed on the steps of Submitting your Blog to BING (So, To Yahoo! too). 
Go to the Official BING WEBMASTER TOOLS WEBSITE(Click Here>>>) and Log In with your MICROSOFTaccount. If you don't have one, Just create one and Log In with that details. 
Now, Click on ADD A SITE option from the List of options that appear on the Left Hand Side of the Window (Depicted in the Below Image). 


In the Next Step, Type your BLOG NAME in the space provided, If you have created a SITEMAP to your Blog, Then Type its URL in its Space (Remember, It is just optional and you can add a SITEMAP anytime later), And Select an option from the Drop Down List Box for the Time when you receive most Traffic in a Day. Then, Click On ADD Button on Completion of the Typing. 


Now, BING will ask you to verify the ownership of your BLOG. To do this, See the OPTION 2 available and copy the META TAG (See the Image as to Where your META TAG will be available) of your Blog. 


Now, Copy the META TAG and Paste it in your Blog's Homepage as you did in case of GOOGLE andSAVE the TEMPLATE. Then, Return to BING WEBMASTER TOOLS and Click on the VERIFY Button. 

Yup, You are done with SUBMITTING YOUR BLOG TO BING AND YAHOO!!! BINGHOO!!!


I have mentioned already, Just submitting the Blog to Search Engines does not matter. You need to PING(Update) your posts to these search engines as and when it is created. To Know about the Steps to PING THE BLOG TO SEARCH ENGINES (Click Here>>>).

If you have any doubts anywhere (or) If you are not getting the desired results, Feel free to leave me aCOMMENT. I will try to solve it for you.
Moreover, If You like my way of Explaining things, SHARE this post with your friends and Offer me aCOMMENT of appreciation.

THANKS for viewing my BLOG.
Anisur Rahman 

Posted By Unknown23:46

Official Speedway GP 2013 (Full) Quality Graphics & Amazing Sound.

Filled under:


Have you got what it takes to become the 2013 FIM Speedway Grand Prix champion? The official FIM Speedway GP 2013 game builds upon the success of its predecessor, packing in even more adrenalin-fuelled thrills and incredible realism, putting you right in the heart of the action. See the mud spray across your visor, hear the roar of the crowd and feel as if you’re really there with the most exhilarating motorcycle game you can get.
FIM Speedway GP 2013 is now bigger and better than ever with enhanced 3D graphics and animation, improved controls and smarter opponents. Race across 16 real-world tracks against the ferocious skills of 15 of the world’s best Speedway riders in the most daring, dangerous and dynamic motorcycle racing game on the Google Play.
AMAZING REALISM 
Console-quality graphics, amazing sound and lifelike physics mixed in with real tracks and riders makes this as close as you’ll get to the real thing.
**NEW** HELMET CAM FOR TOTAL IMMERSION!
Feel the incredible speed thanks to the new Helmet Cam that gives you a first person view of the action. Other camera views also available.

**NEW** LIVE GP MODE
Double your points by playing during a live Speedway GP race.
ALTERNATIVE CONTROLS
Tap on the virtual buttons or swipe to control your bike as it hurtles round the track.
CUSTOMIZATION & 3D REPLAY
Upgrade your bike or boost your performance using store options to for a better start. Use the 3D replay to see how to improve your skills

MULTIPLE GAMEPLAY MODES
Start off in Casual mode and then advance to Pro mode for the ultimate challenge.


VERSION : 1.1.1         REQUIRES ANDROID : 2.3 and up          SIZE : 135 MB

APP SCREENSHOTS

Download : (APK + OBB)
 Instructions:
  • Extract & install Apk
  • Copy ‘com.vividgames.speedwaygp2013′ Folder to sdcard/Android/obb
  • Launch the Game

Posted By Unknown21:51

Amazing 3D Real Boxing Games

Filled under:


Real Boxing™ V1.2.1 (Full) 

★★★ PRICEDROP! Real Boxing just got Best Game of the Year award and to celebrate it is now available at special price - till the end of the week only!!! ★★★
Real Boxing is now MOGA Enhanced! Available at major US retailers and online athttp://www.mogaanywhere.com
"This kicks ass...O.M.G. Real Boxing brings back that same "wow" factor we all had when we first saw a Tegra-optimized game. It's really that good looking, and playing" - Androidcentral
"It’s difficult to argue with a game that looks this good, and plays as well as Real Boxing does. There are so many things to like about this game, beyond howstunning it looks." 5 stars! Apps Magazine
"This Striking Boxing Game is Completely Unreal" Kotaku
Real Boxing™ brings you the most exhilarating, no holds barred fighting action ever seen on Android, Real Boxing's incredible graphics have been optimized for smartphones and tablets that are powered by the NVIDIA Tegra 3 processor to take you closer to the action than you ever thought possible.
Featuring ultra-realistic motion capture from real boxers plus amazing graphics from the powerful Unreal Engine 3, you’ll see sweat and blood fill the air and you’ll feel every hook, jab, and uppercut in Real Boxing, the most exciting boxing game yet on the Android.
★★ Amazing 3D Graphics & Sound ★★
The amazing Unreal-powered graphics and motion capture create astonishing levels of realism. Watch sweat and blood fly with every punch and see your opponent’s face taking injuries; then relish the slow motion action replay of your greatest KO’s.
★★ Experience the roar of the crowd ★★
Fight in atmospheric arenas with authentic commentary. See the flash of the camera bulbs, hear and feel the roar of the crowd like you’re really there.
★★ Incredibly Deep Gameplay ★★
Take-on Career Mode with over 30 fights and three belt titles to conquer. Fight over 20 opponents with their own unique and adaptive fighting styles then train your boxer with mini games including skipping rope, heavy bag and mini bag. Also play KO and Clinch minigames during a round for an energy boost.
★★ Packed with Extra features & Customisation ★★
Unlock new equipment, extra opponents and clothing. Customise your fighter’s appearance: hairstyle, skin colour, tattoos and clothing.

Official Site: realboxinggame.com

VERSION : 1.2.1        REQUIRES ANDROID : 2.3 AND UP             SIZE : 203 MB

APP SCREENSHOTS


Download : APK + SD DATA


Instructions:
  • Extract & Install Apk
  • Copy ‘com.vividgames.realboxing’ Folder to sdcard/Android/obb 
  • Launch the game

Posted By Unknown21:32

How To Submit / Add sitemap.xml to Bing Webmaster Tools

Filled under:


Tips & Tricks Bing Webmaster Tools

After submit sitemap.xml to Google, and then I will try to describe the stages or how to submit / add Bing Webmaters Tools.Seperti sitemap.xml to Google, Bing also has Bing Webmaster tools. Almost all services provided similar to those in Google. You can check Craw errors, submit sitemap.xml, malware detection, and many more issues index to maximize search your website on the search engine Bing.


Immediately, you click on this link for access to the Bing Webmaster tools.
You can log in using a Windows Live account, please register in advance if you do not have accounnt, click Sign Up to register. Now we suppose that you have created a Windows Live account and immediately log in to Bing Webmaster Tools. For those of you who create a blog at wordpress.com or blogspot, you can see how at the bottom of this article.
add site dan sitemap.xml ke bing
As shown in the image above, the first page that appears when you create a new account on Bing. Furthermore Put your website URL in the box and click → ADD. The next step you fill out the application that has been available.!
Add a Site
add a site ke bing webmaster tool
For every point which was given a red asterisk (*) must be filled ..!
ABOUT MY WEBSITE
  • URL = Fill in the URL of your website.
  • Add a sitemap = http://domainanda.com/sitemap.xl
  • When do you receive the most traffic to this site for your local time of the day? = At this point I choose Default.
ABOUT ME
  • First Name, Last Name = Fill in the full name
  • Email email = Column alamt automatically filled in with the email you used to register on Bing.
  • Job role = Can be empty.
  • Company or organization and Name Company or organization size = Please fill in if you have or can fill in the "None"
  • Industry = Same as above options.
  • Contact Phone = Can be cleared.
  • City = Can be cleared.
  • State / Privince, Zip / Postal Code, Country or Region = For Country or Region shall be filled (select).
CONTACT PREFERENCE.
contact preference di bing webmaster tool
  • Contact Preferences: Tick if you would like to receive the latest updates from Bing.
  • Often How would you like to receive messages obout your site (s') issues? and select the schedule, Daily, Weekly or Monthly.
  • Alert Preferences: Check All to Alert Preferences. Then click → Save.
  • Next you will be asked to verify ownership of the website (Site ownnership) → click Verify now.
verifikasi site di bing webmaster tool
To verify the website you can choose one of three Option / options offered.
pilih salah satu dari option untuk verify website atau blog
This blog is for myself I choose the first one to upload files in the public_html directory BingSiteAuth.xml to cpanel.
Option 1: Place an XML file on your web server.
  • Dowload BingSiteAuth.xml.
  • Upload your file to the public_html directory in cPanel. Read how to upload files to a directory
  • Once the file is completed download, then confirm it by opening the link http://domainanda.com/BingSiteAuth.xml dibrowser, if all the process is successful it will appear in your browser as shown below.
  • Your new Click> Verify if the points above to run smoothly.
cara sumbit atau add sitemap.xml ke bing webmaster tools
If no error occurs then there will be a notice on the right Box Verify with green writing that your website or your blog has been verified.
Option 2: Copy and paste a <meta> tag in your default webpage
  • For an option to 2, put the file "meta name" from the bing on your Home Page, this method is the same as verifying the website in Google Webmaster Tools.
  • Log in to wp-admin, click on the menu Appearance → Editor. Right side of the page stylesheet (style.css) → click Header (header.php) and then you put the file "meta name" is among <head> tag ... </ head> And do not forget to click File → Update.
  • After all the process is completed in wp-admin you back to Bing and click → Verify.
Option 3: Add a CNAME record to the DNS. For the third optiaon I do not really understand this, please if you want to try this option.
After all process is complete now you go to the Dashboard, click on the Configure menu → → sitemaps my site. Then you will see the results as shown below.
sitemap.xml barajablog.com
For those of you who have a blog at wordpress.com or blogspot, when add site that must be filled only 2 points the URL and Sitemap.
Cara add sitemap.xml di wordpress.com dan blogspot
→ WordPress.com
  1. Fill in your URL address.
  2. In a Sitemap = Fill http://domainanda.wordpress.com/sitemap.xml.
  3. After log in to wp, Dashboard → Tools (Tools), Paste the file onto the column tag <meta> Bing Webmaster Center and Save the changes.
  4. Back to Bing, you just click → Verify.
  5. You can add the feed to sitemaps, on my site menu → Configure → → add sitemaps sitemaps and enter
  6. http://domainanda.wordpress.com/feed
add sitemap.xml ke bing webmaster tool
→ Blogspot
  1. Fill in your URL address.
  2. In a Sitemap contents with:
  3. http://domainanda.blogspot.com/sitemap.xml
    After that you will be required to verify ownership of the website.
    Site ownership has not verified. → click Verify now.
    And select Option 2: Copy and paste a tag in your default webpage

    Next log in to the blog, click menu Templates → Edit HTML → Continue √ Check the Expand Template> and Paste <meta> tag of Bing in the tag <head> ... </ head>. Then click → Save Template and Close.
    Back to Bing, pull you scroll down you just click → Verify.
    And you can also add a atom.xml on my site menu → Configure → → add sitemaps sitemaps.
  4. http://domain-anda.blogspot.com/atom.xml?redirect=false&start-index=1&max-results=500
add sitemap.xml ke bing webmaster tool
” To address concerns one of our friend who commented on the article, then I will supplement this article with one screenshot of my blog on blogspot.com as add sitemap.xml and add feed to bing web master tool “
add sitemap.xml ke bing webmaster tools
In Bing Webmaster Tools also Supported formats: Sitemap, RSS 2.0, Atom 0.3, Atom 1.0 and text files. So you can choose to register where ..
add sitemap.xml , RSS , Atom and Text Files
The article you are reading now has me re-edited due to a change
sequence in the process add site, add sitemap.xml and verification website
in previous articles because there have been changes to the Bing Webmaster Tools
If an error occurs, there may be steps you forgot or improper order. A good idea to try to read the article above and do when you really have to understand the process and the correct order.
Written by Adheens San
»Leave your comment on my friend read the article, no SPAM, no PROMO LINK in the comments field. This is not a blog but a Social Bookmark who want to Learn Wordpress. »See also Review Gadget Acer Iconia Tablet PC with Windows 8

Posted By Unknown10:10

Tuesday 21 May 2013

How to Remove / Hide / Delete "Powered By Blogger" Attribution Link

Filled under:


remove-powered-by-blogger

How to Remove "Powered by Blogger" Link

Please keep this in mind that this tutorial has been written to help you design a better blog. Sometimes Blogger attribution appears in unwanted areas like in header section or above posts on your template when you use a third party template for your blog. So it needs to be removed from that area to give your blog a beautiful look. Once you remove it from the unwanted area, make it sure that you add an attribution link to Blogger in any suited section. Both ethic and copyright demand it.
Well I hope that you have read the above message. So if "Powered By Blogger" attribution link is appearing on any unwanted section of your Blogger blog's template, this extremely simple tutorial will help you in removing, hiding or deleting it. To delete the "Powered By Blogger" attribution link, follow below steps:

1. Sign in to Blogger dashboard and select your blog
2. In blog's dashboard, go to template section and edit HTML of your template (View screenshot here)
3. Check the box saying Expand Widget Templates at left top corner of HTML editor as shown in above screenshot
4. Press Ctrl+F and find below piece of code
<b:widget id='Attribution1' locked='true' title='' type='Attribution'>
5. Replace the value "true" with "false" and save your template
attribution-remove
6. Now go to Layout section of your template (view screenshot here). You will find attribution gadget there
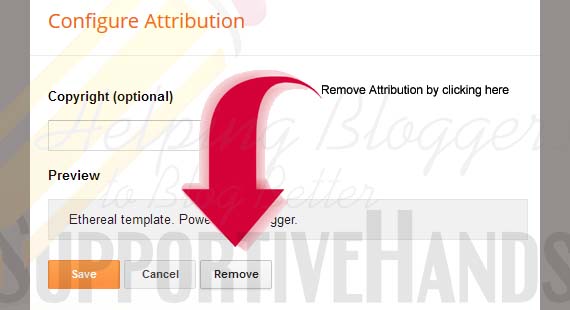
7. Edit attribution gadget and remove it
remove-attribution
8. Save arrangement

You are all done!! But please make it sure that you add  an attribution link in a suited place on your template as you see it on footer of this blog. We hope that you will credit Blogger for its great service. Thank you for your understanding.

Posted By Unknown12:40

How to Show Author Profile picture in Google Search Results: easy method

Filled under:


How to Show Author Profile picture in Google Search Results: easy method
You may have observed that when you search some thing on Google then many posts show author's image with it. Do you also want to show your image with your google search result. Then jut follow the following easy steps to show your author profile picture in google results.
It is very beneficial as clicks to your post increases by a large amount when image is shown. Image provides a good impact on the viewers. And attract them towards it.
So, here is how to add profile picture too google results.

Things You must have Before proceeding

This is the list of things you must have before applying given steps:
  • You must have your own Google+ account.
  • You must have about us page on your website.
These are the things you must have, and also you must have a website :P

Steps To add Profile image to goolge search results

Step 1: 

  • Add the below code to your about us page . You can see here how I have added this code to About us page using "Google+" name.
  • And also add this code to your side bar. You can add this code to side bar by following these steps: Got to blogger-->layout-->Add widget---> HTML/java script---> add this code into it ---> save.
<a href="https://plus.google.com/111498750042128751994"
  rel="author" target="_blank"> Join me on Google+</a>
  • Now change mine Google+ ID with your Google+ ID( The one in yellow)
  • Go to your google plus profile and copy the digits from the address bar as given below

                  
Step 2:
Now next step is to connect Google+ and your website. Here are steps for it:
  • Go to your Google Plus account.
  • Click on profile
  • Edit profile
  • Go to Links Option.
  • Then go to option with contributors. Click on edit.
  • Add your home page URL and About us URL to it.
  • Save the profile.
  • Be careful you must have added a profile picture to your Google+ account that you want to display on post.

Now How to test this If it works

  • To test this go to the Link: Test
  • Fill in your URL
  • If it shows your image and says that Authorship is working then you are done. 
  • Enjoy
Note: You must wait for 10-15 days for seeing your image on your posts.

Hope it worked for you and you liked it. Comment.

Posted By Unknown04:41
Related Posts Plugin for WordPress, Blogger...