Showing posts with label Windows. Show all posts

Monday 20 May 2013

Partition Hard Drive in Windows 7 Without Formatting

Filled under:


With the advent of the technical world comes new operating systems each with some more facilities than its predecessor. The same happened with Windows. Recent operating systems like Windows 7 and also Windows Vista has a great dexterity in them that the hard disk can be partitioned, re-sized without formatting your computer. Here, we discuss how to partition hard drive in Windows 7 Ultimate and Starter.

Shrinking or expanding the Hard Drive in Windows 7 can be brought about by a utility program known as Disk Management. How will you delete, re-size, or even create a new partition in this operating system is hereby described below:

Guidelines and procedure for the entire operation to be carried out successfully to Partition Hard Drive in Windows 7

First of all go to “ Start ” and then on the window that appears search for ” Computer ” and then once you right-click on it another window opens and then you should navigate to the option “ Manage “.

At once a new window will open entitled  “Computer Management“. In this new window click on “ Storage ” and then go to “ Disk Management “.

The completion of the second step will give you a view of all the drives present in your computer.

Among these select the one you want to partition. Then right-click on the selected drive and navigate to the option ” Shrink Volume.. “.

A new window should open in which the size of the drive before shrink will be mentioned and the available space to shrink will be mentioned , and in the next line you will be asked to enter the amount of space you want to shrink and this will be the size of the new partition.
Caution :The space you enter must be within the limit of the available space displayed above.

After entering the values click on the option “ Shrink ” and wait for the process to complete. The time taken for the operation may be long depending upon the size of the disk and the space to be shrunk. Once the operation is completed a window appears showing unallocated space and the value is exactly the one you entered earlier. Select this unallocated space and on right clicking on it click on the option “ New Simple Volume “.

A wizard will open up. Go through the wizard and fill in the values required. Usually the value needed to enter is the same one that you entered as the volume to be shrunk.
The drive newly created needs a letter to be assigned to it. Assign any letter of your choice as it does not make any difference.
A Format page will appear and in it carefully notice that the File System selected is “ NTFS ” . After this is done enter a name for your drive and then click on ” Next ” and then “ Finish “.

You have reached your goal. You have partitioned your Hard Drive in Windows 7 without formatting your computer and without the use of any software. Feel free to drop your comments in the comment box.
The complete video tutorial:
Partition Hard Disk without Formatting [Screencast]
* Update: This article was written on the basis of a test in Windows 7 Ultimate version. But after getting the readers feedback, it seems that the procedure does not work fine in the other versions of Windows 7 like Home Premium etc. So please make sure that you are using Windows 7 ultimate before applying this method to partition the hard drive.
** Update: While the procedure works fine in Windows 7 Ultimate version, it does not work in Windows 7 home, starter or other versions properly if the number of partitions exceeds 4. That means if you try to create a new partition that is no. 5 in your hard disk, this process will not work otherwise it will work fine. So if you are in Windows 7 Home or starter edition, make sure that your total no of partition is three before you go for a new partition.
The above solution was made by one of our reader Hide.
So you have to make sure your unallocated drive is not no.5. I had to merge move files from recovery drive somewhere else and merge it with the unallocated one. After that I just followed everything here and it worked like magic. Hope this helps.
Thanks to Hide. Read his words at the comment section.

Posted By Unknown22:13

Thursday 9 May 2013

Install Windows XP using USB Flash Disk/ Flash Drive - Step by Step Guide

Filled under:

If you want to install Windows XP, but your notebook (or PC) has no CDROM, you should install Windows XP using USB Flash disk/Flash Drive/Thumb drive...
Just follow this guide :


Step 1:
Buy a USB Flash Drive (at least 2GB 1GB).
When you do this tutorial, please make sure your computer/laptop/PC has a CD-ROM (or DVD). You need computer with CD-ROM in it to build bootable USB flash drive and then you can install XP on any other computers (netbooks) with no CD-ROM / DVD (e.g. Acer Aspire One, Asus EEE-PC, etc.)

Step 2:
Download this software package (Komku-SP-USB.exe - Download) 1.47MB


This software pack contains 3 applications :

-BootSect.exe (Boot Sector Manipulation Tool)
-PeToUSB (http://GoCoding.Com)
-usb_prep8 (Prepares Windows XP Setup LocalSource for Copy to USB-Drive)

Step 3:
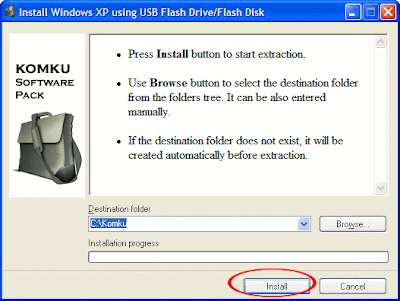
Double click Komku-SP-usb.exe


A window will appear... And click Install


Step 4:
Insert your USB Flash Drive.
When I made this tutorial, I was using 4GB Transcend USB FlashDrive...


Locate folder C:\Komku\PeToUSB\
Double click PeToUSB.exe


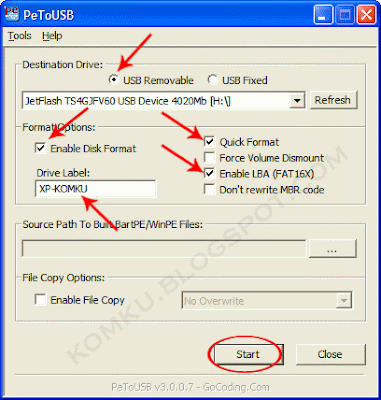
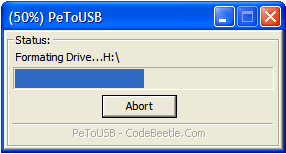
A window will appear like this...


Destination Drive : select USB Removable
Check on Enable Disk Format
Check on Quick Format
Check on Enable LBA (FAT 16x)
Drive Label : XP-KOMKU (or whatever you want)
Then click Start

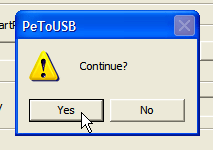
Click Yes to continue....


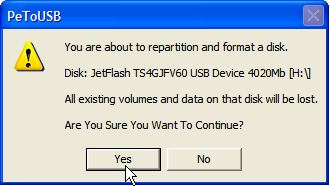
"You are about to repartition and format a disk. Disk: .... All existing volumes and data on that disk will be lost. Are You Sure You Want To Continue?"
Click Yes


Wait a few seconds...

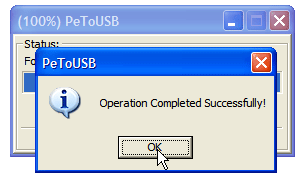
Click OK, and you can close the PeToUSB window.


Step 5:
Open Command Prompt ...
Click Start > Run > type cmd > click OK


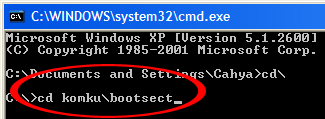
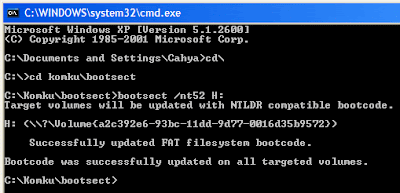
On Command Prompt window, go to directory C:\Komku\bootsect\how to do this?
First type this cd\ and press Enter

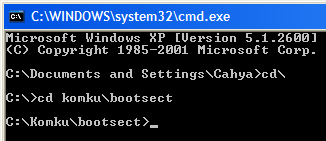
Then type cd komku\bootsect and press Enter


The result...


Don't close the Command Prompt window, and go to step 6...


Step 6:
On command prompt window, type bootsect /nt52 H:


H:
is the drive letter for my USB Flash Drive, it may be different with yours...
And press Enter

The result... "Successfully updated filesystem bootcode. Bootcode was successfully updated on all targeted volumes."


Don't close the Command Prompt window, and go to step 7...


Step 7:

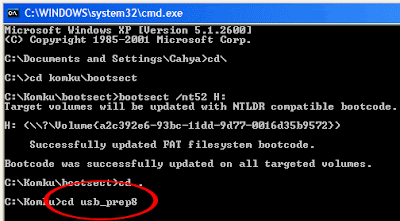
Now type this cd.. And press Enter

Then type cd usb_prep8 and press Enter


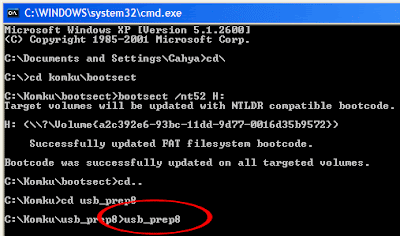
Type usb_prep8 again... And press Enter


Step 8:
Your command prompt window will look like this


Press any key to continue...
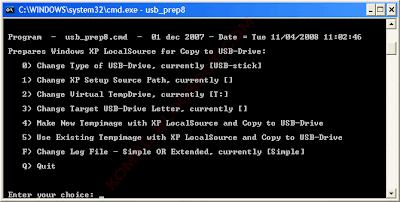
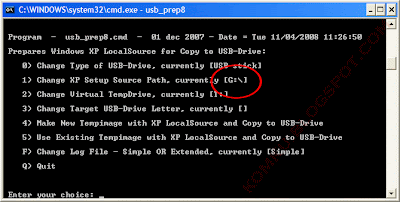
usb_prep8 welcome screen will appear


Prepares Windows XP LocalSource for Copy to USB-Drive:

0) Change Type of USB-Drive, currently [USB-stick]
1) Change XP Setup Source Path, currently []
2) Change Virtual TempDrive, currently [T:]
3) Change Target USB-Drive Letter, currently []
4) Make New Tempimage with XP LocalSource and Copy to USB-Drive
5) Use Existing Tempimage with XP LocalSource and Copy to USB-Drive
F) Change Log File - Simple OR Extended, currently [Simple]
Q) Quit
Enter your choice:_

Now, insert your original Windows XP CD, or Windows XP with sata ahci driver to your CD/DVD ROM
And back to the Command Prompt window

Type 1 then press Enter...
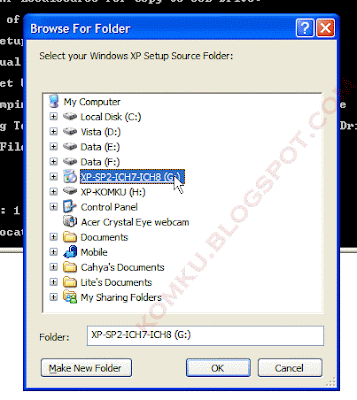
"Browse For Folder" a window will appear, select your CD/DVD drive and click OK


The result... "XP Setup Source Path" changed to G:\ (yours may be different)


Now for point 2, if letter T is currently assigned to a drive in your computer, you must change it.... If not, leave it as it is
How to change it?
Type 2 and press Enter...

"Enter Available Virtual DriveLetter"
For example you don't have drive S so you type S and press Enter 

Back to usb_prep8 welcome screen...
Now type 3 and press Enter...


"Please give Target USB-Drive Letter e.g. type U" Enter Target USB-Drive Letter:
Because my Flash drive letter is H

 So, type H and press Enter...

After back to usb_prep8 welcome screen...
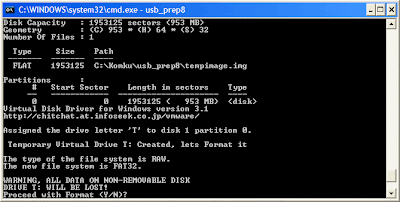
Now type 4 and press Enter to make a new temporary image with XP LocalSource and copy it to USB Flash Drive
Please wait a few seconds..


"WARNING, ALL DATA ON NON-REMOVABLE DISK
DRIVE T: WILL BE LOST! Proceed with Format (Y/N)?"
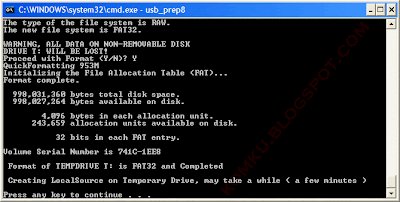
Type Y and press Enter
Please wait....
When format virtual disk complete, press any key to continue...


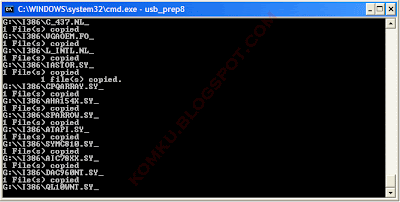
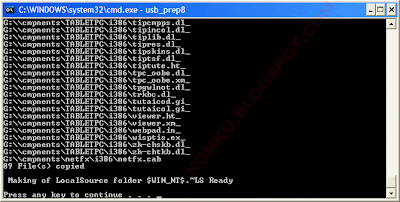
Please wait... Making of LocalSource folder is in progress...


When "Making of LocalSource folder $WIN_NT$.~LS Ready"
Press any key to continue...


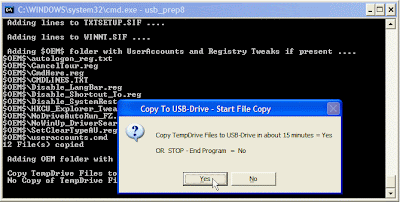
"Copy TempDrive Files to USB-Drive in about 15 minutes = Yes OR STOP = End Program = No"
Click Yes, and wait...


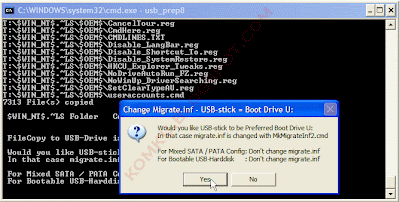
"Would you like USB-stick to be preferred Boot Drive U: bla... bla..."
Click Yes


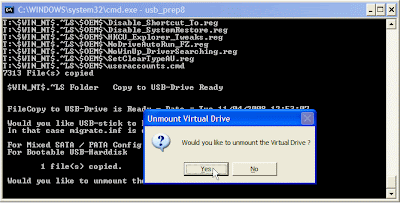
"Would you like to unmount the Virtual Drive ?"
Click Yes, wait a few seconds, and press any key....
Press any key again to close usb_prep8...


Now, your USB Flash Drive is ready...


Step 9:
Now, insert your USB Flash Drive/Flash Disk/Thumb Drive to your notebook (e.g. Acer Aspire One)
Go to BIOS and make your USB Flash Drive or USB HDD (or USB ZIP in some other machine) as primary boot device....

Then boot from your USB Flash Drive....
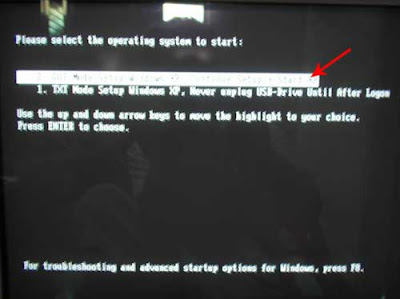
And select "TXT Mode Setup Windows XP, Never unplug USB-Drive Until After Logon"


After Hard Disk detected, delete all partitions, create a single partition... And install Windows XP on that partition...
And wait...


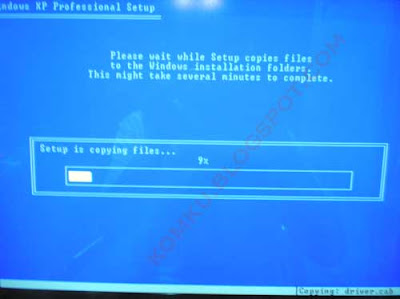
Once text mode setup is complete, the computer will restart....
This time select "GUI Mode setup Windows XP, Continue Setup + Start XP"


Continue Windows XP setup.... And Done!
Windows XP Installed....


Remember, you can use this tutorial to install Windows XP on any computers.. Even the one with CD-ROM not just Aspire One and Asus EEE-PC....
Good luck!

Posted By Unknown10:55

Saturday 4 May 2013

How To Burn Blogger RSS Feeds At Feedburner

Filled under: , ,

What is RSS?

A RSS (Really Simple Syndication) feed is a XML-based format for your content. Most blogging platforms, for example, will have an RSS feed built in. Whenever you start publishing posts, your latest posts will be updated in the RSS feed. Visitors to your website can subscribe to your blog’s RSS feed in an RSS reader such as Google Reader.

What is FeedBurner?
Most blogs have RSS feed which is detected automatically by commonly used feed readers when the blog URL is added to the reader.

However, if you want to make it more obvious and easier for readers to subscribe using RSS, or want to know exactly how many people subscribe to your blog then the best option is to add a Feedburner RSS feed and email subscription to your blog.

Feedburner is a free web service which enhances bloggers and podcasters ability to manage their RSS feeds and track usage of their subscribers.


How to create a feed with feedburner

1. Go to Feedburner and sign in to Feedburner with your Google Account (create a Google Account first if you don’t have one).

2. To set up your RSS feed with Feedburner, simply copy the URL of your RSS feed and paste it into the “Burn a feed right this instant” box. Then click Next >>


3. On the next screen, choose the second options - RSS.


4. On the next screen you will be given your RSS feed’s new URL on Feedburner. You will want to use this URL anywhere you reference your RSS feed on your blog. Change the feed title and address with your own.


5. When you click on Next, you will be given the options to setup tracking features for your RSS feed.
Check "Clickthroughs" and "I want more!..." options.


Adding Your Feedburner Feed To Your Blog

This is used to add the RSS icon and easy subscribe options to your blog side bar using a text widget as explained below:

1. Click on the Publicize Tab > Chicklet Chooser in your Feedburner account and copy the HTML code.

2. Go to Blogger Dashboard > Design > Page Elements and add a new gadget

3. Select HTML/JavaScript from the pop-up window and paste the html code in the box.

Adding a FeedBurner Email Subscription

After you have set up your feed, you will want to consider giving visitors the option to subscribe to your content via email. If so, you will want to go to the Publicize tab and click on Email Subscriptions. Click on the Activate button to start email subscription service for your RSS feed.


You will then want to click on Communication Preferences in the left sidebar menu. This will allow you to customize the activation email subscribers receive to confirm their subscription.


Once customized, click Save. The next options you will want to configure are under Email Branding in the left sidebar menu. This is where you can upload a logo, customize the Email Subject line, and change the font styles, colors, and sizes to format the email subscribers will receive. Click Save when finished.

The last (and most important) setting for your email subscription is the Delivery Options. This is where you will tell Feedburner what time to deliver new RSS feed updates to subscribers.

Once saved, click on the Subscription Management link. Here, you can get the code to add a subscription form on your blog or you can get a link to your take visitors to the opt-in form for subscribing via email.

To add it on your blog:

1. Go to Blogger Dashboard > Design > Page Elements

2. Add a new Gadget

3. Select HTML/JavaScript & paste the code in the box.

Redirecting All Your Blog Feed To Feedburner

Unless you redirect all your blog feed to Feedburner you won’t get accurate subscriber numbers because some of your readers subscribe using your original blog feed.

To do this:

1. Go to Settings > Site Feed in your blog dashboard

2. Add your Feedburner address to Post Feed Redirect URL and click Save Changes.


3. Now all your feeds is automatically redirected through FeedBurner and you’ll be able to track subscribers.

Posted By Unknown11:23

Monday 18 March 2013

Remove Junk Files to Speed Up System via GiliSoft Free Disk Cleaner

Filled under:


re you facing problem with the performance of your Windows operating system? Everything is happening slow? The most probable reason is junk files. Your PC is getting cluttered with junk files over the time. Downloading, browsing, opening any document and creating files leave some remaining part of redundant files in the temp folder of your computer. Even, installing or uninstalling an application can leave such redundant files. These cause your computer being slower.
It also happens mostly during the read & write process when a lot of data has to be located and changed by the system. Removing those unwanted files makes a lot of free space to store your data in future. So the best way to get a better performance with your PC is to clean up your Computer regularly.
But it is hard to locate those junk files in your hard disk. Finding them manually between separate folders is nothing but finding parle in the ocean. It also consumes a lot of your precious time. So, intent of trying to find out those folders manually, I’d suggest GiliSoft Free Disk Cleaner. It is safe to use and effective. It cleans up the junk files from computer automatically. It also allows you to choose and delete content from the Computer.
How to install and use Gilisoft disc cleaner

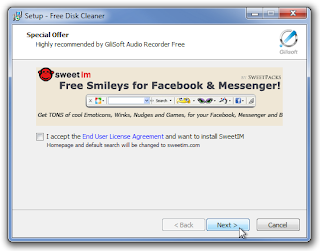
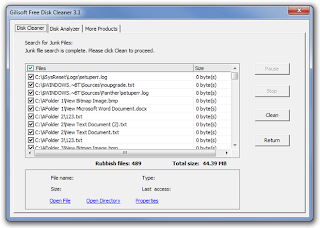
 Once completed, the application allows you to select the desired one among all the connected hard disks for scanning and after this, GiliSoft will list out all the zero byte files, temporary files and all kind of junk files from the selected hard disks. Check all those files for deletion and clickClean for continue.
 You can also use the Filter option under Disk Cleaner tab to add and remove specific filter type while searching for junk files.

Under Disk Analyzer tab, you can choose to analyze all the hard drive one by one and it gives you the complete data sheet like total number of file, size, percentage consumed, file types (Compressed Files, Image Files, Documents, Audio Files, Video Files, Other and Rubbish Files). 

 
  • Finally, I’d like to say that this free disk cleaner GiliSoft is the best tool to remove junk files from your computer. Moreover, it works with all the versions of Windows i.e. Windows XP, Windows Vista and Windows 7.

Posted By Unknown07:07
Related Posts Plugin for WordPress, Blogger...