Friday 24 May 2013

How to Show/Add Related Posts at Bottom of Blogger/BlogSpot

Filled under:


show-related-posts-on-blogspot-blogs

How to Show Related Posts On Blogger/BlogSpot Blogs

Related post suggestions under your blog posts are very useful for both your blog and your blog's visitors in several ways. Where your visitors will find other related and useful content for them, at the same time, Related Posts will boost your search engine ranking also by decreasing bounce rate on your blog and by increasing deep linking. On WordPress blogs, you will find many plugins which will allow you to show related posts under your blog post easily but with Blogger Blogs, the task is little bit difficult. You need to add different codes to yourBlogger Blog template to display related posts under your posts. This type of code editing will not work with all Blogger templates, so I am suggesting you a very easy-to-setup online service which will add related posts under yourBlogger Blog posts in less than three minutes. The service is LinkWithin which adds beautifully laid-out related posts with thumbnails under each post on yourBlogger blog. Many bloggers don't like this service to use on their blogs due to the addition of LinkWithin attribution link which the service puts with the post suggestions to promote itself. I will provide you a piece of CSS code which will remove LinkWithin Attribution Link.

How to Setup LinkWithin to Show Related Posts on Your Blogger Blog

1. First of all visit http://linkwithin.com and provide your blog URL and other details to fill out the form, select Blogger as your platform and click on Get Widget! to proceed to the second and final step

 2. In this step, click on Install Widget link. You must logged into your Blogger blog dashboard during this step. If you aren't, provide your login credentials after clicking the Install Widget link. Once you reach your Blogger blog dashboard, select your desired blog, to which you want to add related posts and then click on "Add Widget". In the next page, Save Arrangement of your blog's layout. You are all done!!!
add-related-posts-to-your-blogger-blog-posts
Now visit any post on your blog. You will see related posts suggestion with thumbnails at the bottom of your posts. Now next step is to remove LinkWithin Attribution Link. If you feel comfortable with the link, then you might decide to leave this link as it is. It will credit the developers. But if you don't want to keep this attribution, below is the CSS code and procedure which will removeLinkWithin Attribution Link.

How to Remove LinkWithin Attribution Link from Related Posts on Your Blogger Blog

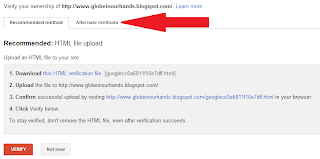
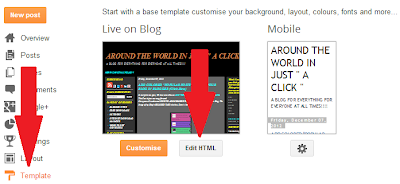
1. To remove the LinkWithin attribution link, login to your Blogger blog dashboard, select your blog and then select Template from the sidebar list. After that, click on Customize

2. In the next window, click on Advance, then on Add CSS and paste the below provided CSS code in the box. After pasting the code, click on  Apply to Blogbutton on right top corner. You have now successfully removed the LinkWithin attribution link from related posts on your Blogger blog.how-to-remove-linkwithin-link-blogger

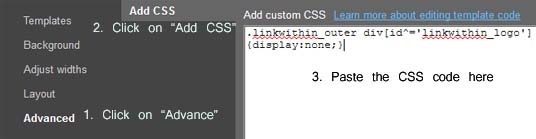
CSS Code for Removing LinkWithin Attribution Link

.linkwithin_outer div[id^='linkwithin_logo']
{display:none;}

Posted By Unknown03:17

Thursday 23 May 2013

Change The Date of Your Published Posts in Blogger

Filled under:


Posts time-to-time gets outdated and requires a comprehensive edit.  To provide up-to-date information to your users, it is necessary for you to make timely changes in your published posts.  After comprehensively making an edit in your posts, you would want it to show up as a new post with a new date. This would not only make your content current, but would also help you to dig up your old articles by displaying them on your homepage. In this article, we will teach you How to Edit the Date of your Published Posts in Blogger?

Why to Edit your Old Posts?

Things are enjoyable when they are up-to-date. You would not like to write everything again in a form of a new article just because your old article was out-of-date. Replicating same content with minor changes might end up in traffic downfall because not only users, but search engine hates duplicate content. Updating your existing posts is the ideal way to keep your content fresh. People always admire that website which always decorates their content with most accurate and trustworthy information. 

How to Change Date of Posts?

The first thing you need to do is to Login into your Blogger account. After logging in go to Your Site >> Posts. Now it would display a list of the titles of the articles which are published on your blog. You can search for the article through the Search bar by typing the title of your article.  Upon finding the article, hover over its Title and you will be able to see “Edit Post” button, just press it and head to the next step.
It would take you to the Post editor. Now make all the necessary changes in your content. Once you finish editing your article, it’s time to update the publish date of your post. Now go to Post Setting >> Published on >> Set date and time (You will find it on the right side of your screen).
Now you will be able to see a small calendar type gadget. At this point, you can change the date and time of your post to the most current one. Press the done button to save the changes that you have made to your date and time.
After doing all the changes, press the update button present the top of your screen. That’s all, now you your article have a new date and time. Furthermore, if you have chosen the current date then, it would appear at the top of your homepage.

We hope this article would help you guys in keeping your content fresh and recent. We would like to ask you a question, how often do you edit your articles, how often you make changes in the publish date? Let us know by commenting below.

Precautions:

By changing the Date of your article, you are also renaming the URLs of your old articles. So make sure you redirect your old post URL to the new one. This will transfer your all PageRank juice to a new destination. 

Posted By Unknown11:00

High Quality Most Popula blogger templates 2013

Filled under:


If you’re looking for free and best blogger templates which were released in 2013 then here is an article which is composed of some of the best blogger templates which are very beautiful. While some of these templates have adopted the design from WordPress themes, the others are standing high as they represent themselves uniquely. The blogger templates which I’m sharing through this article are freely available over the internet and I’m only making a good list out of it. These templates will definitely improve the design of your blog.

High Quality Most Popula blogger templates 2013

Template By MBT
mbt-blogger-template-v-2

 
Template design by Labnol
labnol blogger template
 

 MaxMag Responsive Blogger Template

MaxMag Blogger Template


CopyBlogger Template V2.0

CopyBlogger Template V2


Blogism Blogger Template

Blogism Blogger Template


Artarius Blogger Template

Artarius Blogger Template


Metro BTK V2 – Impressive Blogger Template

Metro BTK V2 – Impressive Blogger Template


Loved these blogger templates? Share your experience through the comments below. PS – Please make sure that you don’t remove footer links. Respect the developers who have released these themes for free. 

Posted By Unknown10:40

Most Beautiful New Islamic Blogger Template 2013

Filled under:

Al-Islamic Blogger Template

Template Name: Al-Islamic Blogger
Platform: Blogger / Blogspot
Release date : 20, April 2013
License : Creative Commons Attribution 3.0

DownloadPreview


Al-Islamic is a purely religious blogger template dedicated to the whole Muslim community that believes in that the Holy Prophet Mohammad PBUH is the last prophet of Allah. While creating this template, we tried our best to use decent and religious colors and pictures so that it does not mislead anyone in any case. This theme is partially responsive and works pretty well on all key browsers like Google Chrome, Firefox and even Internet Explorer. This template is ideal for Islamic and religious websites.

Al-Islamic Blogger Template

Features of Al-Islamic Blogger Template: 

  1. Nivo Image Slider: Featured content sliders are now considered as the core element of a website. Keeping that in mind, we have added a decent Nivo Image slider in this theme. This slider is extremely lightweight and hardly causes any slowness in the blog.

  2. Islamic Blogger Template: The gigantic collection of blogger themes has quite a few Islamic themes, so considering this fact our team has decided to create a large collection of Islamic theme especially for those Muslims who love to endorsee their religion. 

  3. Light-weight Social Share:  In this theme, we have also added modest social share options. It is not elegant, but it does looks beautiful with large cluster of your content.

  4. Multi-drop down menu: We also incorporated a Multi drop down menu in this theme. To provide more flexibility, we have not used any jQuery file. In fact, everything works on CSS.

  5. SEO-Friendly: This theme is absolutely wonderful for search engines. This theme has the highest search engine optimization score. The speed of this template is 92 out of 100 according to Google Speed insights. 
More Features: Magazine Style, brownish color scheme, threaded commenting system, three Columns footer, Timeline Style Template, 2 column template and much more

From the Designer's Desk:

We hope this theme would help my Muslims brothers to grow the roots of Islam through this Template. We have added almost all gadgets, so there is no need to do lots of editing. If you liked this template, then do share it with your friends.

Posted By Unknown10:09

How to display or show comment-author's profile image in BlogSpot blogs

Filled under:


Here's another useful tip for those bloggers, who are continuously trying to transform their free BlogSpot blogs into a pro-blog.
Through this hack, within 10 minutes you can start showing the images of commentators/comment-authors in your blog.


See the image below; how it will look after tweaking the HTML default code


To do so, first of all log in to Blogger
Now go to Layout, then click on Edit HTML tab.
Now Download the present template as a back up
Then click on "Expand widget templates"

Now search (CTRL+F) this

</head>

Immediately BEFORE IT, paste this:

<!--COMMENT-AUTHOR-PICTURE-STARTS--><script src='http://dsai.588.googlepages.com/blogger_comment_author_photos.js' type='text/javascript'/>
<script type='text/javascript'>
//<![CDATA[
addLoadEvent(function(){showCommentPhotos('commentphoto','comment-author', 1);});
//]]>
</script><!--COMMENT-AUTHOR-PICTURE-STOPS-->

NOW see this code below:

<dl id='comments-block'>
<b:loop values='data:post.comments' var='comment'>
<dt class='comment-author' expr:id='"comment-" + data:comment.id'>
<div class='commentphoto' style='float:right;'/>
<a expr:name='"comment-" + data:comment.id'/>
<b:if cond='data:comment.authorUrl'>
<a expr:href='data:comment.authorUrl' rel='nofollow'><data:comment.author/></a>
<b:else/>
<data:comment.author/>
</b:if>
<data:commentPostedByMsg/>
</dt>
<dd class='comment-body'>
<b:if cond='data:comment.isDeleted'>
<span class='deleted-comment'><data:comment.body/></span>
<b:else/>
<p><data:comment.body/></p>
</b:if>
</dd>
<dd class='comment-footer'>
<span class='comment-timestamp'>
<a expr:href='"#comment-" + data:comment.id' title='comment permalink'>
<data:comment.timestamp/>
</a>
<b:include data='comment' name='commentDeleteIcon'/>
</span>
</dd>
<div style='clear:both;'/>
</b:loop>
</dl>
In the code above YOU HAVE TO INSERT code lines shown in BLUE and BOLDED
And the red ones, are those which you can use as markers, BEFORE whom you have to paste the blue code lines.

You can change the position of pictures or images from Right to Light, by changing it in the first blue line in the code above...
Now whenever, people use their gmail or openid account to comment, then their pictures will be displayed alongside the comments !<>

Posted By Unknown01:57

Wednesday 22 May 2013

Step-by-Step Tutorials-SUBMIT YOUR BLOG TO THE THREE SEARCH ENGINE - GOOGLE, YAHOO AND BING

Filled under:

Just Signing up for Blogger and posting posts regularly in your Blog does not make your job complete in any sense. What is the point of posting when none in the World knows about it???

Yeah, The immediate step after creating a Blog account in Blogger is SUBMITTING IT TO SEARCH ENGINES (Particularly GOOGLEBING and YAHOO!). By this process, You just say GOOGLEYAHOO!and BING that "I'm also competing in this Internet world by Posting Blogs, And I request you to Display those Posts on your pages when searches are made." 

Let us now proceed with the steps of SUBMITTING THE BLOG to GOOGLEYAHOO! and BING.

1. SUBMITTING YOUR BLOG TO GOOGLE:


Follow the steps given below to submit the Blog to GOOGLE.

Log in to the GOOGLE WEBMASTER TOOLS WEBSITE (Click Here to Go to the WEBSITE) with yourGOOGLE account. If you don't have one, Then Create one by clicking on the SIGN UP Button on the Top Right corner of the Website and Log in with those details. 


Now, Click on ADD A SITE Button (Which is indicated in the below Image) to add your Blog to GOOGLE


Now, Enter the URL of your blog in the space provided. (Example: www.YOURBLOGNAME.blogspot.com) 


In The next step, You have to verify the ownership of your Blog (GOOGLE just wants to be sure you areORIGINAL OWNER of your Blog). To make your VERIFICATION PROCESS get completed soon, Click on the ALTERNATE METHODS Tab as indicated in the Image. 


Here, You are provided with three options, HTML TAGGOOGLE ANALYTICSDOMAIN NAME PROVIDER. Just click on the HTML TAG Radio Button and you will be provided with a META TAG.


Now, Copy the META TAG and Paste it in your Blog's Homepage. Just make it sure that you paste theMETA TAG in the HEAD SECTION BEFORE THE FIRST BODY SECTION

Aren't you clear of Where to paste this META TAG, Just follow the below instructions to Paste the META TAG in the right place.

Go to your BLOG'S DASHBOARD and Select TEMPLATE and Click on EDIT HTML Button available underLIVE ON BLOG View (As Indicated in the below Image). 


Now find the below TAG in your Blog's HTML Coding Using CTRL+F Shortcut. 


<title><data:blog.pageTitle/></title>

Just Paste the META TAG (Which you copied previously, REMEMBER????BEFORE/ABOVE the foundTAG in the previous step.
After Pasting the META TAG, Just SAVE the Template and RETURN to the GOOGLE WEBMASTER TOOLS again and Click the VERIFY button at the bottom. 

Now, The Webmaster Tools will check to see, If the META TAG is present in your Blog or not. If it is,GOOGLE will VERIFY you as the SITE OWNER of the Blog.
If your verification is Successful, You will receive the following sort of message. (Leave the META TAG in your BLOG'S CODING to keep your Blog verification stand permanently even after verification is completed). 
That is it, Your Blog is One in GOOGLE now!!!

KEEP IN MIND THAT JUST SUBMITTING YOUR BLOG TO GOOGLE DOES NOT KEEP IT UPDATED ALL THE TIME. YOU WOULD NEED TO PING YOUR BLOG POSTS WHENEVER YOU CREATE A NEW POST. Follow this Link to PING YOUR BLOG TO GOOGLE (CLICK HERE>>>).

2. SUBMIT YOUR BLOG TO YAHOO!/BING:

Keen viewers of my Blog May ask me this QUESTION!!! For Blog submission to GOOGLE, I used "SUBMIT YOUR BLOG TO GOOGLE" as a Subheading, Whereas I have linked the steps for Submitting the Blog toYAHOO! and BING under a single Subheading as "SUBMIT YOUR BLOG TO YAHOO!/BING". So Am I being loyal to GOOGLE more than BING (or) YAHOO!???? 

It is not the case !!! I will tell you the fact here. 

"ONCE YOU HAVE SUBMITTED YOUR BLOG TO BING, IT MEANS YOU HAVE SUBMITTED YOUR BLOG TO YAHOO! TOO"

But How???? Yeah, Your ANSWER is here.
"It was on August 2010, MICROSOFT and YAHOO! signed a deal to become partners instead of competitors in their DOMAIN SEARCHING. Hence, They became a NewALLIANCE in searching. The Important point of the deal is that BING (Owned byMICROSOFT) will be the search engine behind YAHOO!."
Now, You say me, Is my Subheading for this topic apt?

Having Gained an Extra knowledge on Search Engines, Lets proceed on the steps of Submitting your Blog to BING (So, To Yahoo! too). 
Go to the Official BING WEBMASTER TOOLS WEBSITE(Click Here>>>) and Log In with your MICROSOFTaccount. If you don't have one, Just create one and Log In with that details. 
Now, Click on ADD A SITE option from the List of options that appear on the Left Hand Side of the Window (Depicted in the Below Image). 


In the Next Step, Type your BLOG NAME in the space provided, If you have created a SITEMAP to your Blog, Then Type its URL in its Space (Remember, It is just optional and you can add a SITEMAP anytime later), And Select an option from the Drop Down List Box for the Time when you receive most Traffic in a Day. Then, Click On ADD Button on Completion of the Typing. 


Now, BING will ask you to verify the ownership of your BLOG. To do this, See the OPTION 2 available and copy the META TAG (See the Image as to Where your META TAG will be available) of your Blog. 


Now, Copy the META TAG and Paste it in your Blog's Homepage as you did in case of GOOGLE andSAVE the TEMPLATE. Then, Return to BING WEBMASTER TOOLS and Click on the VERIFY Button. 

Yup, You are done with SUBMITTING YOUR BLOG TO BING AND YAHOO!!! BINGHOO!!!


I have mentioned already, Just submitting the Blog to Search Engines does not matter. You need to PING(Update) your posts to these search engines as and when it is created. To Know about the Steps to PING THE BLOG TO SEARCH ENGINES (Click Here>>>).

If you have any doubts anywhere (or) If you are not getting the desired results, Feel free to leave me aCOMMENT. I will try to solve it for you.
Moreover, If You like my way of Explaining things, SHARE this post with your friends and Offer me aCOMMENT of appreciation.

THANKS for viewing my BLOG.
Anisur Rahman 

Posted By Unknown23:46
Related Posts Plugin for WordPress, Blogger...